Each SecurePass location comes with its own specific settings and configuration options providing great flexibility for the clients and their needs. Under each client, there are multiple locations and each location has it's own integration settings which means you are able to configure specific door groups within ProtegeGX to then assign to each SecurePass client location providing greater control and a tidier setup of segregating door groups dependant on the clients' requirements.
An overview of the ProtegeGX settings in SecurePass
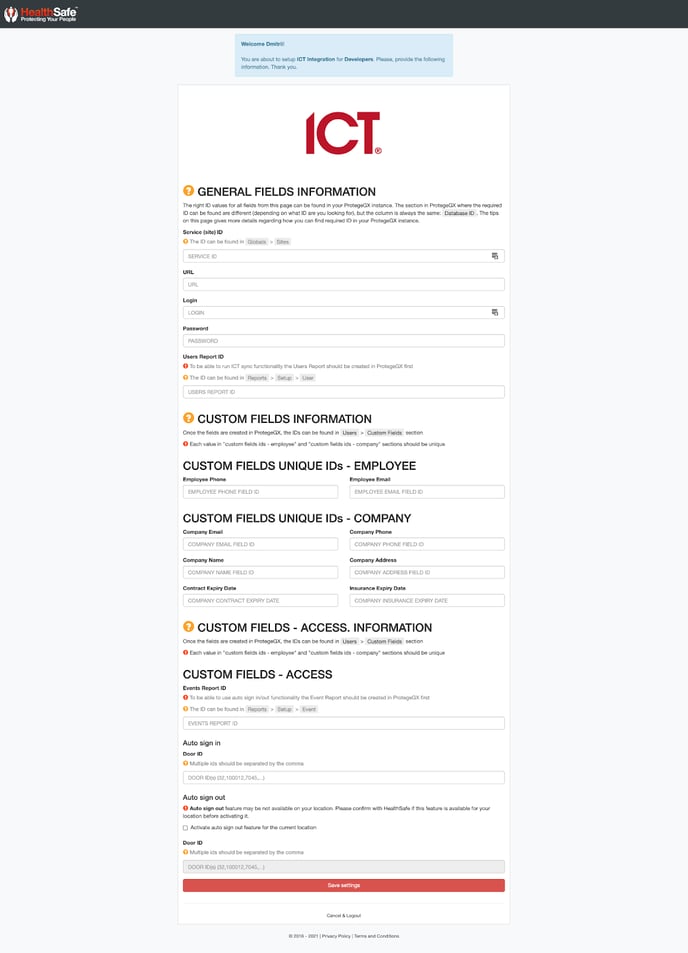
You as the integrator will be invited by the Admin or our internal HealthSafe Superadmin to create an integrator user account in SecurePass. After you have successfully registered your SecurePass account, you may login and view the following integration fields. The following fields allow you to match the fields and ID's between ProtegeGX and SecurePass in order for the two systems to communicate automatically. This setup process will only occur once when setting up for the first time unless the client requires some changes in their access control onsite. Below is a brief description of what each field is:
Note: If you have yet to receive your integrator user invitation, please contact the SecurePass Admin at the client location or contact us at HealthSafe to assist you.
"General fields information" section
The correct ID values for all fields from this page can be found in your ProtegeGX instance. The section in ProtegeGX where the required ID can be found are different (depending on what ID you are looking for), but the column is always the same: Database ID. The tips on this page give more details regarding how you can find required ID in your ProtegeGX instance.
Service (site) ID: "Site" is the main environment with the set of unique entries and settings.
The ID can be found in Globals > Sites.
URL: This field allows the SecurePass location to source the appropriate information related to the clients SecurePass location.
Main URL for the connection. Can be found once ProtegeGX installed on a server via installation wizard. Please note that URL may include the port. URL example: http://ict.domainname.co.nz:9999/ProtegeGXSOAPService/Service.svc
Login: Use this field to enter the username to access the data in ProtegeGX.
Password: Enter the confidential password to allow SecurePass to fetch the required information for synchronization.
Users Report ID: To be able to run ICT sync functionality the Users Report should be created in ProtegeGX first.
The ID can be found in Reports > Setup > User
"Custom fields information" section
Once the fields are created in ProtegeGX, the IDs can be found in Users > Custom Fields section.
Each value in "custom fields ids - employee" and "custom fields ids - company" sections should be unique.
Please remember that you need to provide the id of the column for the following fields, not its name or value from it.
Employee Phone: This is the Contractor Business Employee’s contact number column id configured in ProtegeGX. eg. 32
Employee Email: This is the Contractor Business Employee’s email column id configured in ProtegeGX. eg. 25
Company Email: This is the Contractor Business’ email column id configured in ProtegeGX. eg. 17
Company Phone: This is the Contractor Business’ phone column id configured in ProtegeGX. eg. 20
Company Name: This is the Contractor Business’ name column id configured in ProtegeGX. eg. 82
Company Address: This is the Contractor Business’ address column id configured in ProtegeGX. eg. 63
Contract Expiry Date: This is the Contractor Business’ contract expiry date column id configured in ProtegeGX. eg. 102
Insurance Expiry Date: This is the Contractor Business’ insurance expiry date column id configured in ProtegeGX. eg. 104
The custom fields are very useful if the client already has the contractors and contracting businesses pre-loaded into ProtegeGX which will save them a lot of time needing to migrate this information from ProtegeGX to SecurePass as this would do it automatically. Syncing the contracting businesses and contractors' profiles will also allow the client to maximise the use of the governance features of SecurePass providing a lot more value to the client. It is important to sanitise the information and create the proper custom fields in ProtegeGX prior to importing it to SecurePass. Please note, the examples given below are just examples, you will need to check the client's ProtegeGX instance to find the given custom field names given.
Click here to learn more about how to synchronise contractor employees.
Click here to learn more about how to synchronise contractor businesses.
"Custom fields - access" section
To be able to use auto sign in/out functionality the Event Report should be created in ProtegeGX first.
The ID can be found in Reports > Setup > Event.
Events Report ID: The id of the Event Report created in ProtegeGX
Auto sign-in - Door ID: This field is to assign which door/reader ID's are to be configured to be the main entrance points of the building/site. When this is configured correctly, Staff who are registered in SecurePass will appear on the SecurePass dashboard as signed in to the site when they badge in at that specific entry door using their traditional access cards.
Click here to learn more about the Staff auto sign-in feature.
Auto sign out - Door ID: The same as above, but this field related to sign out feature.
Once you have completed this form, press the 'Save settings' button at the bottom and SecurePass will attempt to verify the credentials you have entered.